At Living Bright Interiors, we talk a lot about designing homes around the life that actually happens inside them, but the principle does not stop at the back door. Outdoor living spaces, patios, pergolas, and the lawns that frame them, are just as much a part of the Closed Loop Home as your kitchen layout or your reading nook. A thriving lawn is the visual foundation that makes every outdoor seating arrangement, fire pit, or dining set look intentional rather than accidental, and when it fails, the whole design reads as unfinished no matter how carefully you chose the furniture.
That is why so many of our readers who invest in a thoughtful patio or outdoor room get blindsided by a lawn that never fills in correctly. The grass is the backdrop against which everything else is judged, and if it arrives patchy, stressed, or dead within a few weeks, the whole outdoor room suffers. Homeowners in Southern California dealing with fast-draining soils and intense afternoon sun often find that working with a dedicated service for Anaheim sod delivery and installation prevents the guesswork that derails so many do-it-yourself projects. The mistakes below are the ones we see most often undoing an otherwise well-planned outdoor space, and each one has a specific, avoidable fix.
Mistake 1: Skipping or Rushing Soil Preparation
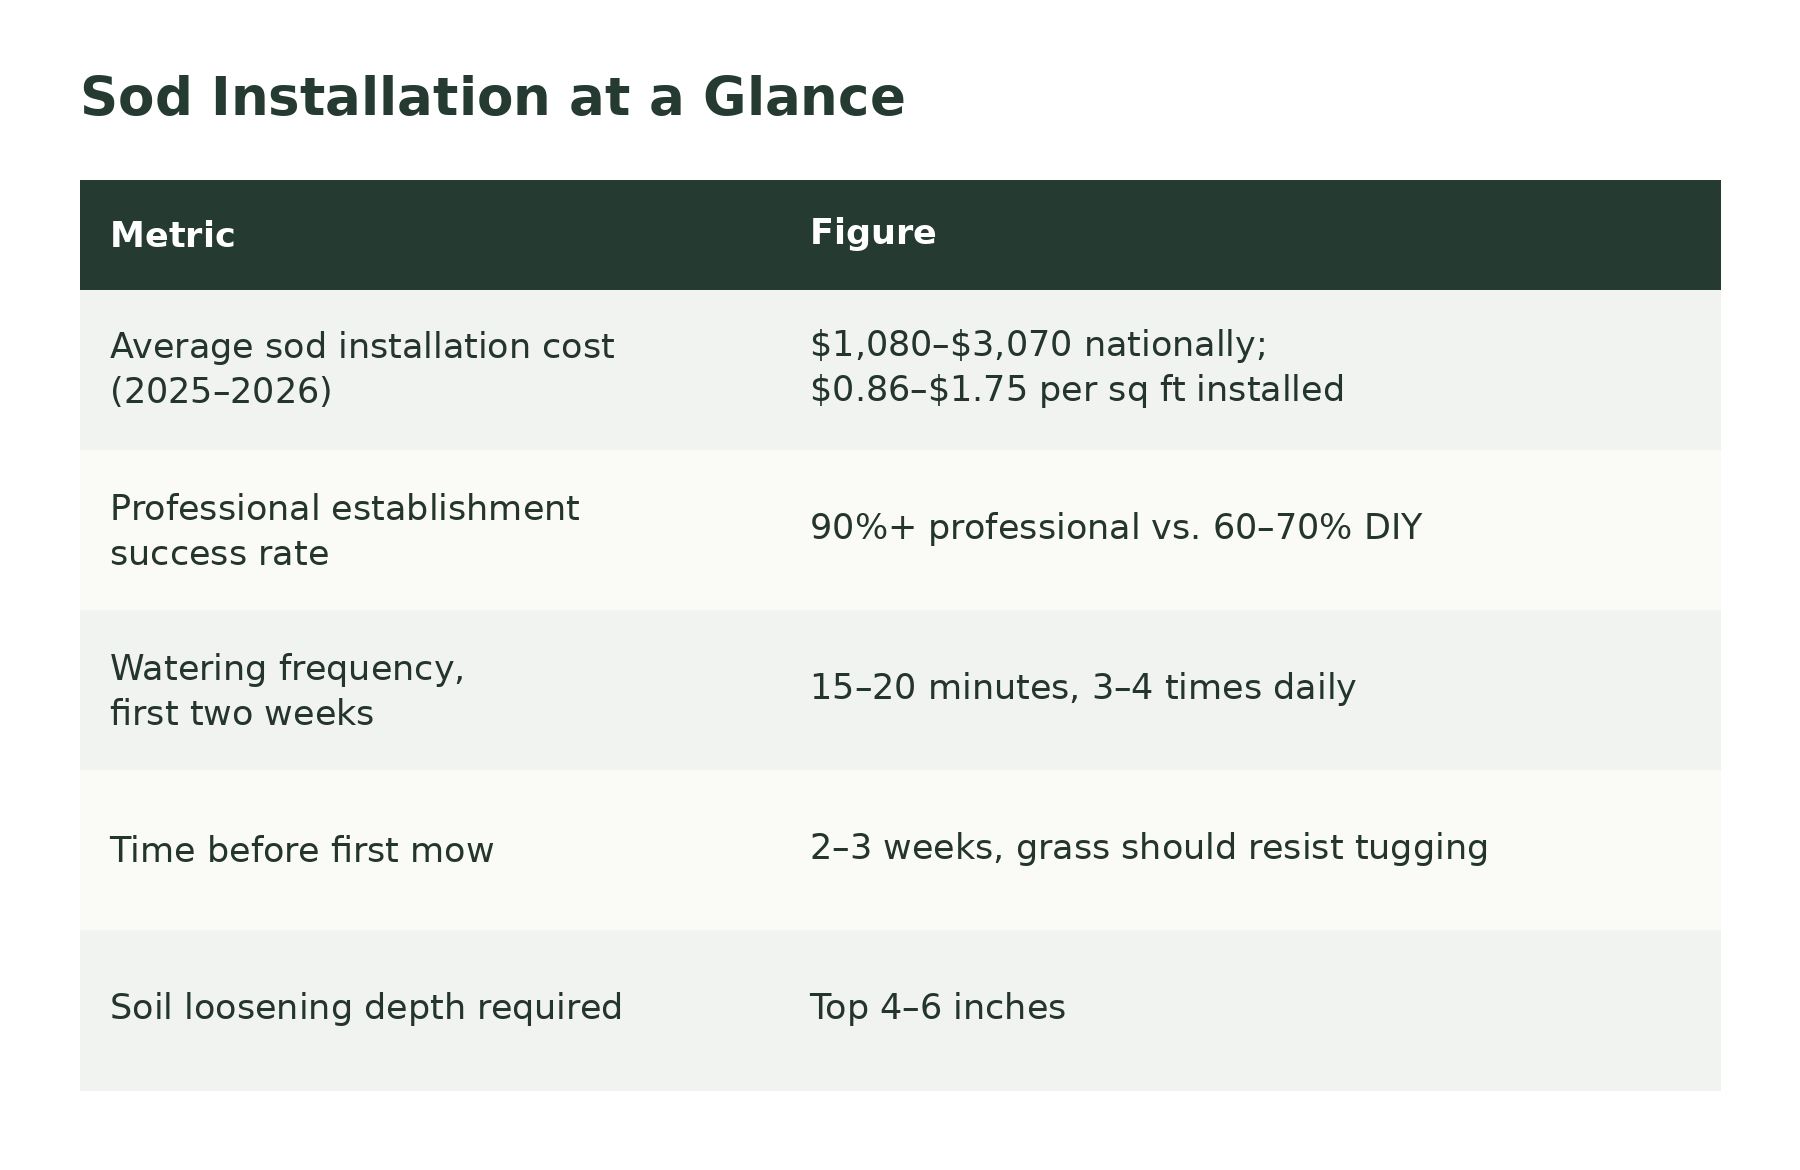
The single most common failure point happens before a single roll of sod ever touches the ground. Homeowners eager to see green grass fast will till lightly, rake out the big rocks, and lay sod directly over compacted soil left behind by construction crews or years of foot traffic. The problem is that grass roots cannot push through compacted clay or leftover construction fill, and the top four to six inches of soil must be fully loosened before installation for roots to establish properly. Skipping this step does not just slow growth, it creates a shallow root system that collapses under summer heat stress within the first season.
The fix requires patience that most DIY schedules do not budget for. Soil should be tilled to a full six-inch depth, amended with compost if the native soil is heavy clay or overly sandy, and graded so water drains away from structures rather than pooling under the new lawn. This is also the moment to correct any pH imbalances or nutrient deficiencies, since adding fertilizer later cannot compensate for a poor foundation. Once sod is down, there is no going back to fix the dirt underneath without tearing out grass that has already started rooting, which wastes both the material cost and the labor already invested.
Mistake 2: Incorrect Watering Practices
The second mistake is almost the opposite problem: homeowners either panic and overwater or assume sod can handle the same watering schedule as an established lawn. New sod needs short, frequent watering sessions, typically fifteen to twenty minutes, three to four times daily during the first two weeks, adjusted for weather and soil type. Watering too infrequently lets the thin root layer dry out and die before it ever anchors into the soil beneath, while watering too heavily drowns the roots and encourages fungal disease before the grass has a chance to establish.
Getting this right means checking soil moisture by hand rather than relying on a fixed sprinkler timer set once and forgotten. Lift a corner of sod after a few days; if the soil underneath is dry and crumbly, the schedule needs adjusting upward, and if it is soggy or smells sour, it needs to come down. According to Amazing Architecture, soil prep cannot be patched after the fact without pulling up the sod again, and watering mistakes compound daily until the root system either survives or fails, making the first days after delivery the most critical window for long-term lawn health. This is precisely the kind of detail that separates a lawn that thrives from one that needs replacing within a year.
Mistake 3: Poor Sod Placement and Lack of Rolling
Even with good soil and correct watering, sloppy placement during installation creates visible seams and gaps that never fully close. A common shortcut is laying sod pieces in a straight brick pattern without staggering the joints, which creates weak lines where grass struggles to knit together. Another frequent error is skipping the rolling step entirely, leaving air pockets between the sod and the soil that prevent root contact and cause the edges to dry out and brown within days.
The correction is straightforward but easy to rush past when you are tired and the pallet is half gone. Stagger each row like brickwork, press pieces snugly against each other without overlapping or leaving gaps, and run a water-filled lawn roller over the entire area immediately after laying each section. This single step pushes out trapped air and ensures every blade of grass has direct soil contact, which is the difference between a lawn that roots evenly and one with a patchwork of thriving and dying sections. Professionally installed sod sees an establishment success rate above ninety percent largely because of disciplined attention to these placement details, compared with sixty to seventy percent for typical DIY jobs according to UC Davis research.
Mistake 4: Mowing Too Soon
The final mistake is impatience at the finish line. New sod typically needs two to three weeks before it is ready for its first mow, and the real test is not a calendar date but whether the grass resists a gentle tug. Homeowners who mow early, assuming two weeks of growth means two weeks of readiness, often pull entire patches loose because the roots have not yet anchored firmly enough to withstand the mower's wheels and blade pressure.
Waiting for the tug test to pass before the first cut protects weeks of careful watering and soil work from being undone in a single afternoon. When that first mow does happen, keeping the blade height higher than usual and avoiding sharp turns on the new turf reduces stress further. Treating your lawn with the same patience you would apply to curing concrete or settling new flooring, ideas we explore more broadly in our thinking around closed loop home services, pays off in a lawn that looks intentional for years rather than one that needs costly patch repairs by the following spring.
Outdoor spaces deserve the same deliberate thinking that goes into choosing a sofa fabric or a lighting fixture, because the lawn is often the largest single surface a guest sees when they walk into your backyard. Avoiding these four mistakes, rushed soil prep, inconsistent watering, careless placement, and premature mowing, protects the investment you have already made in furniture, hardscaping, and design. A lawn that establishes correctly the first time becomes the quiet, reliable backdrop that lets everything else in your outdoor living space do its job.